

Creasol UniRec2

Creasol UniRec2
Technische Spezifikationen:
- Unterstützte Frequenzen: 433.42, 433.92, 434.15, 434.42, 868.3, 868.5, 868.8 MHz, 288÷418MHz (außerhalb der EU)
- Empfindlichkeit: -110dBm
- Stromversorgung: 7÷36Vdc oder 7÷27Vac
- Stromverbrauch: 2÷12mA im Standby, 20÷90mA bei aktivierten Ausgängen
- Ausgangsleistung: Maximal 5A, 30Vdc oder 250Vac
Installation: Der Empfänger sollte in einem geeigneten Umfeld installiert werden, bei hoher Luftfeuchtigkeit in einem IP65-Gehäuse. Eine externe Antenne sollte gemäß den Anweisungen angeschlossen werden. Schutzsicherungen sind für die Stromversorgung und die Relaisausgänge erforderlich.
Konfiguration: Standardmäßig ist der Empfänger auf 433,92 MHz AM konfiguriert. Änderungen können durch Drücken der Prog-Taste vorgenommen werden. Verfügbare Betriebsmodi sind Hold-to-Run, Bistabil und Timer-Modi.
Fernbedienungen anlernen: Zum Anlernen einer Fernbedienung die Prog-Taste drücken, bis die LED grün leuchtet, dann den Lernmodus aktivieren. Die LED zeigt den Status des Lernvorgangs an.
Sicherheit und Gewährleistung: Der Empfänger sollte nicht in sicherheitskritischen Systemen verwendet werden. Die Installation muss von einem qualifizierten Techniker durchgeführt werden. Die Gewährleistung deckt nur Material- und Herstellungsfehler ab.
CE-Konformität: Der UniRec2 entspricht der Richtlinie 2014/53/EU. Die Konformitätserklärung ist online verfügbar.
Programmierung von Fernbedienungen auf Kanal 1:
- Normales Lernen: Drücken Sie die Prog-Taste einmal, um den Kanal auszuwählen, und dann zweimal, um den Lernmodus zu starten. Drücken Sie die Taste auf der ersten Fernbedienung (TX RC1), um sie zu lernen, und wiederholen Sie den Vorgang mit der zweiten Fernbedienung (TX RC2). Beenden Sie den Lernvorgang durch erneutes Drücken der Prog-Taste.
- Lernen als AUS-Funktion: Drücken Sie die Prog-Taste dreimal, um den Kanal und die Funktion auszuwählen, und dann zweimal, um den Lernmodus zu starten. Drücken Sie die Taste auf der ersten Fernbedienung (TX RC1), um sie zu lernen, und wiederholen Sie den Vorgang mit der zweiten Fernbedienung (TX RC2). Beenden Sie den Lernvorgang durch erneutes Drücken der Prog-Taste.
Katalogauszüge

Multi-frequency 2ch receiver Works with almost any remote control, fixed and rolling code, AM and FM. Multifrequency universal receiver with 2 relay outputs, 250V 5A max. Receives in 1 or 2 frequencies, selectable by the user, AM/FM: 433.42, 433.92, 434.15, 434.42, 868.3, 868.5, 868.8 MHz, 288-418MHz. Smart Home Solutions http://www.creasol.it ENGLISH Introduction: this 2 channels universal receiver is able to work with different kinds of remote Controls, fixed and rolling code, AM (OOK) and FM (FSK), even if they operates in 2 different frequencies and/or different modulations. Up to 2 frequencies and modulations can be selected by the user so, for example, it's possible to use the receiver at 433.92MHz OOK, 868.3MHz FSK, or both 433.92MHz OOK and 868.8MHz FSK. Remote controls should be learned into the receiver, so when a programmed code is received the corresponding relay output is activated. It can be used to replace a nonoperational receiver, a rolling code receiver or it can be used to add a new frequency to an existing receiver. Also it can be used to control one or two actuators by a remote control, e.g. lights, small motors/pumps, or UP/DOWN roller shutter motor: in this case set parameter 7 to 4 to prevent that UP and DOWN motors can be enabled simultaneously. Relay outputs are protected by overvoltage by varistors. It supports up to 1000 different remote controls (the number depends by the type/length of the transmitted code) and codes/configuration can be saved to/read from an optional/removal memory, so it's possible to move the configuration to another receiver easily. It also supports “master remote controls”, that are not used to activate the output, but to enable programming new remote controls for that output without the need to physically access the receiver. Installation: device should be placed in a proper environment: in case of high humidity, place inside an IP65 case. Connect external antenna (coaxial cable) as indicated in the silkscreen, or a single wire on the left-side screw connector, with length equal to 8cm for 868MHz, 17cm for 433MHz or 25cm for lower frequencies. Connect through protecting fuses both the the power supply and relay outputs! Configuration: this device is supplied pre-configured to receive at 433.92 MHz, AM modulation.To modify this configuration, press quickly the button Prog a number of times corresponding to the programming channel (if needed), the parameter number and the desired value, as shown in the figure. If programming fails, a long red flash is emitted. In hold-to-run mode the output is active until the button on remote control is released. In bistable mode, the remote control button is used to toggle the output ON-OFF-ON-OFF. In bistable ON/OFF mode, one button is used to switch output ON, and another button to switch output OFF. In timer modes, normally it's needed only a button to switch output ON for the programmed time: if the button is pressed again while output is ON, after more than 10s, the output is switched OFF. For any bistable or timer mode, it's possible to program one or more remote controls that are capable to only switch output OFF: follow the instructions below, selecting channel 3 (OFF function corresponding to channel 1) or 4 (OFF function corresponding to channel 2). Learning remote controls: press the Prog button 1 or 2 times, corresponding to the selected channel, or 3 or 4 times for the corresponding OFF functions: Led goes solid green. Press Prog twice to enable learning mode: Led starts flashing slowly. Press a button on the remote controls that should be learned. Every time a new code is learned, the 10s timeout is reload and Led flashes twice if the code is programmed, 3 times if was already learned, 6 times if memory is full. During the learning process, the receiver sensitivity is reduced to avoid the possibility of learning unwanted remote control transmitting from a distant location. Anyway, be careful about this. Removing remote controls: press the Prog button from 1 to 4 times, corresponding to the selected channel: Led goes solid green. Press Prog 3 times, then press button on remote controls in the same way as learning procedure. Led flashes 4 times for any removed code. To remove all remote controls from memory, press the Prog button 10 times, wait for Led flashing, then press Prog button 3 times; press button 4 times instead of 3 to also do a factory reset (default configuration). Learning master remote controls: press the Prog button 1 or 2 times, corresponding to the selected channel: Led goes solid green. Press Prog 4 times, then press button on remote control: this remote controls will not activate the output, but can be used to enable learning procedure without the need to access the receiver and press Prog button. To learn new remote controls in this way, put the master remote control in trasmission for 2s, then keep in transmission for 2s the new remote controls that should be learned: every time a new remote control is learned, the 10s timer is reload to permit successive learnings. Security and safety: do not use in systems that require a high level of anti-theft security. Installation should be done by a qualified technician, in a well insulated enclosure, protected by dust, high humidity, steam and contact with other circuits and metal parts. All responsibility, for any damage caused by not complying with the instructions in this manual, is declined. Warranty: complies with statutory requirements, and covers only defects, within the product itself, in material and manufacture. Your local stockist should be contacted in connection with any warranty-related matters. CE Declaration of Conformity: Creasol hereby declares that this receiver UniRec2 is in compliance with the essential requirements and other relevant provisions of Directive 2014/53/EU. Declaration of Conformity can be obtained from http://www.ce.creasol.it
Katalog auf Seite 1 öffnen
Set frequency to 868.3MHz (default:433.92MHz) Press Prog 5 times (parameter) Led shows Press Prog current value 3 times (2=433MHz) (3=868MHz) Led shows new setting for channel 2 Configure channel 1 in hold-to-run mode (default:timer 500ms) Press Prog 1 time (select ch.1) Press Prog 6 times (parameter) Led shows current setting Press Prog Led shows 1 time new setting (hold-to-run) Program two remote controls on channel 1 and terminate learning Press Prog 1 time (select ch.1) TX RC1 TX RC2 Press Prog TX remote Learned! TX Learned! Press 2 times remote R.C.2 Prog to (start learning) control 1 exit...
Katalog auf Seite 2 öffnenAlle Kataloge und technischen Broschüren von Creasol
 Creasol UniRec1
3 Seiten
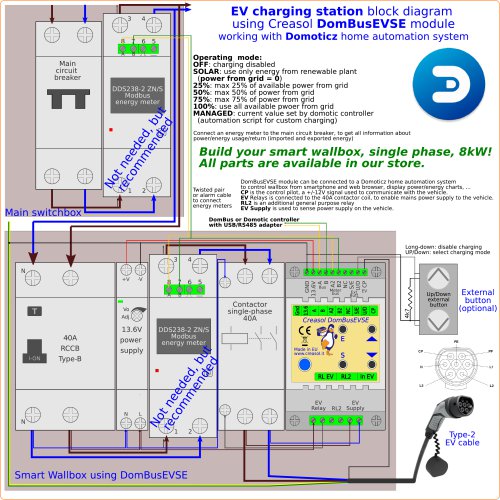 creDomBusEVSE_schema1
1 Seite
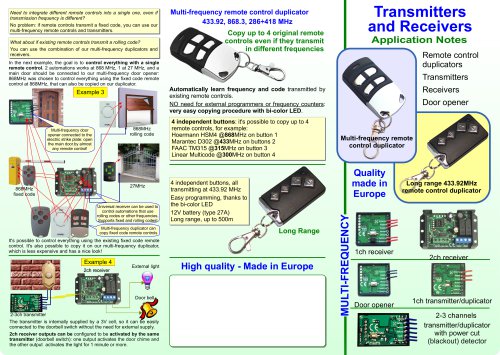 Transmitters and Receivers
2 Seiten
 CreasolCatalog
22 Seiten
- Digitaler E/A
- E/A-Modul
- Analoger E/A
- Digitales E/A-Modul
- Drahtlose Fernbedienung
- Fernbedienung mit Knöpfen
- Analoges E/A-Modul
- Serie-E/A
- IO Module / für DIN-Schiene
- Kompakter E/A
- E/A-Modul / Serie
- Modbus-E/A
- Kompakte Fernbedienung
- Netzwerk-E/A
- E/A-Modul / Modbus RTU
- Lithium-Fernbedienung
- Analoges Eingangsmodul
- E/A-Modul / Netzwerk
- E/A-Modul / RS-485
- E/A-Karte